13 Costly Home Renovation Mistakes To Avoid

Turning a house into a home can feel incredibly rewarding. In fact, 25% of responding homeowners from our annual Housepower Report revealed home upgrades were one of their key priorities for 2025. On top of that, 55% of homeowners said they plan to complete more DIY projects in 2025.
But renovating can be tricky even for homeowners with experience—let alone someone without that technical knowledge.
Before you start your next project, consider these tips to help you avoid costly home renovation mistakes. You can also take these tips along on your next DIY project with our free home renovation mistakes checklist found at the end of this post.
1. Not reviewing homeowners insurance coverage
It’s important to determine how much homeowners insurance you need for your unique circumstance. Renovations or upgrades could impact your insurance coverage limits and might not be covered by your existing policy.
In fact, our recent DIY Projects and Costly Mistakes survey of over 1,700 DIY home owning enthusiasts found that 20% wished they had reviewed their insurance coverage prior to kicking off their project.
Even more alarming? More than half of responding homeowners (54%) reported using financial assistance to help cover damages caused by a DIY project gone wrong. To help avoid taking on financial debt, remember to contact your insurance company to help ensure your policy is up-to-date, and that you’re financially covered if something goes wrong.
Understanding the difference between maintenance, repairs, and renovations can also help inform your decisions. Insurance coverage addresses each of these items differently:
- Maintenance involves routinely inspecting and servicing your property's systems. This can help you save on insurance costs by allowing you to identify issues early (before they become big problems) and avoid claims altogether.
- Repairs, on the other hand, are fixes for damage caused by unexpected events like storms or accidents, and these are often covered by insurance policies (though with potential deductibles or exclusions).
- Renovations, which involve substantial home improvements, generally aren’t covered by standard homeowners insurance. Major renovations might require specific coverage like builder's risk insurance.
2. Underestimating the project scope and cost
- Clearly define what you hope to achieve with this renovation. Is it improving aesthetics, increasing functionality, or adding home revalue? The answer to this question will be your north star during the project and help guide your decision-making process.
- Make a list of features you want to have and features you need to have. This will help cut down on items that are not necessary if you run into any budgetary or time constraints.
- Do your research and ask the professionals. Rely on reputable sources before starting a home renovation, and make sure the websites, contractors, and other sources you use are certified or knowledgeable.
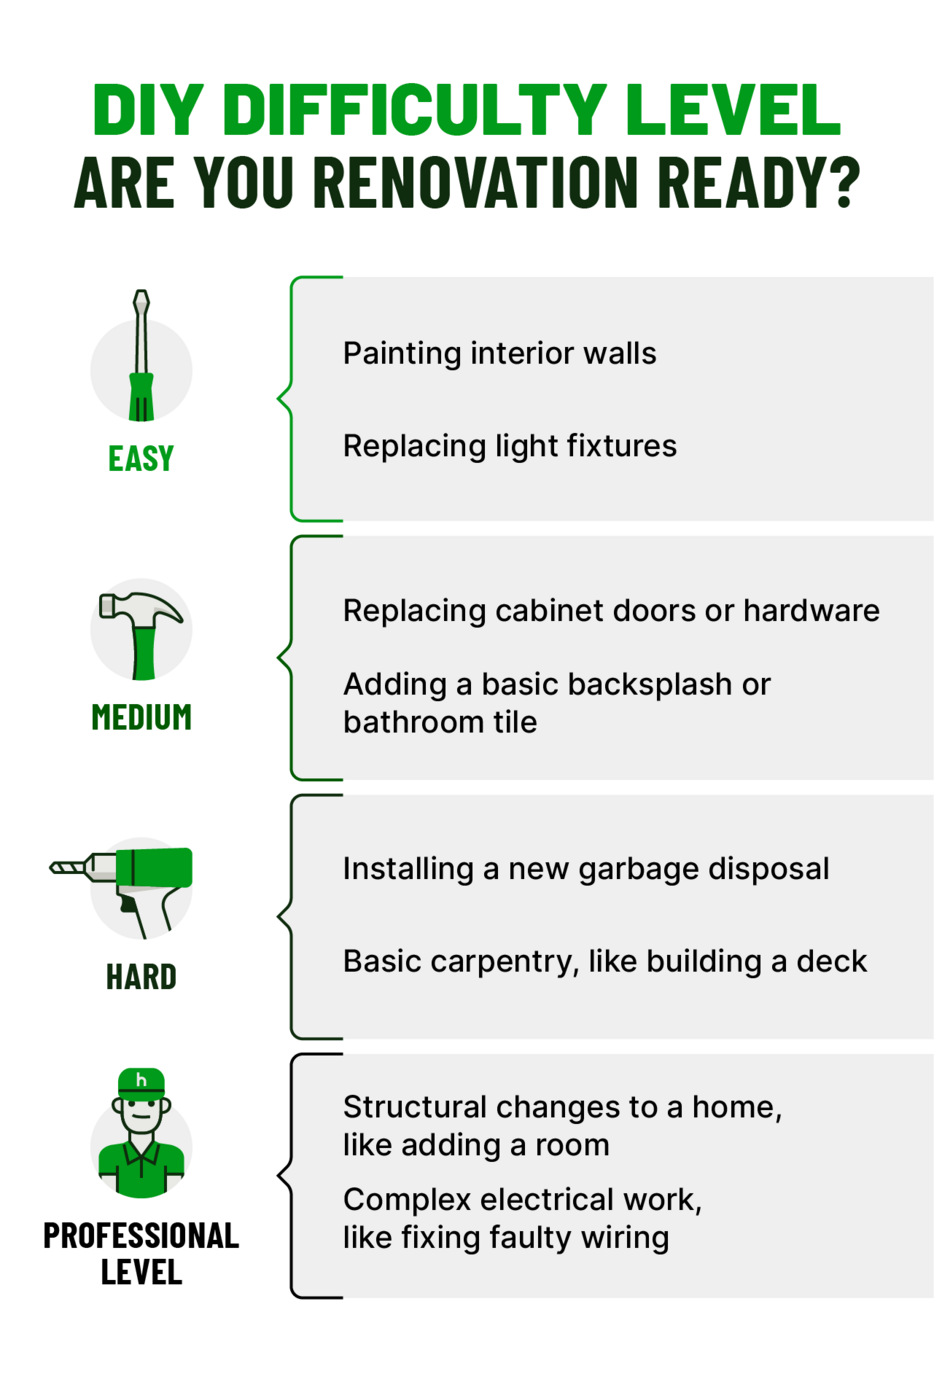
- Be honest about your own skill level. It’s okay if you are confident in taking on only parts of the project but not others. Know your limits and recognize when it is time to call a professional. Check out tip number 11 and 13 for more details on how and when to call in the cavalry.
3. Not planning for surprise issues
- Before starting, inspect the project area for signs of water damage, mold, pests, structural issues, etc.
- Create a contingency budget by allocating a portion of funds for unexpected costs. The amount should depend on the scale of your project, but 5-10% of your total project budget can be a good rule of thumb.
- Research your home's age and history to help uncover potential problems common to homes built in your time period. These could include things like faulty wiring or lead paint.
- Plan for delays so you’re not surprised if you run into setbacks. A flexible timeline can help manage stress and avoid mistakes that come with rushing a project.
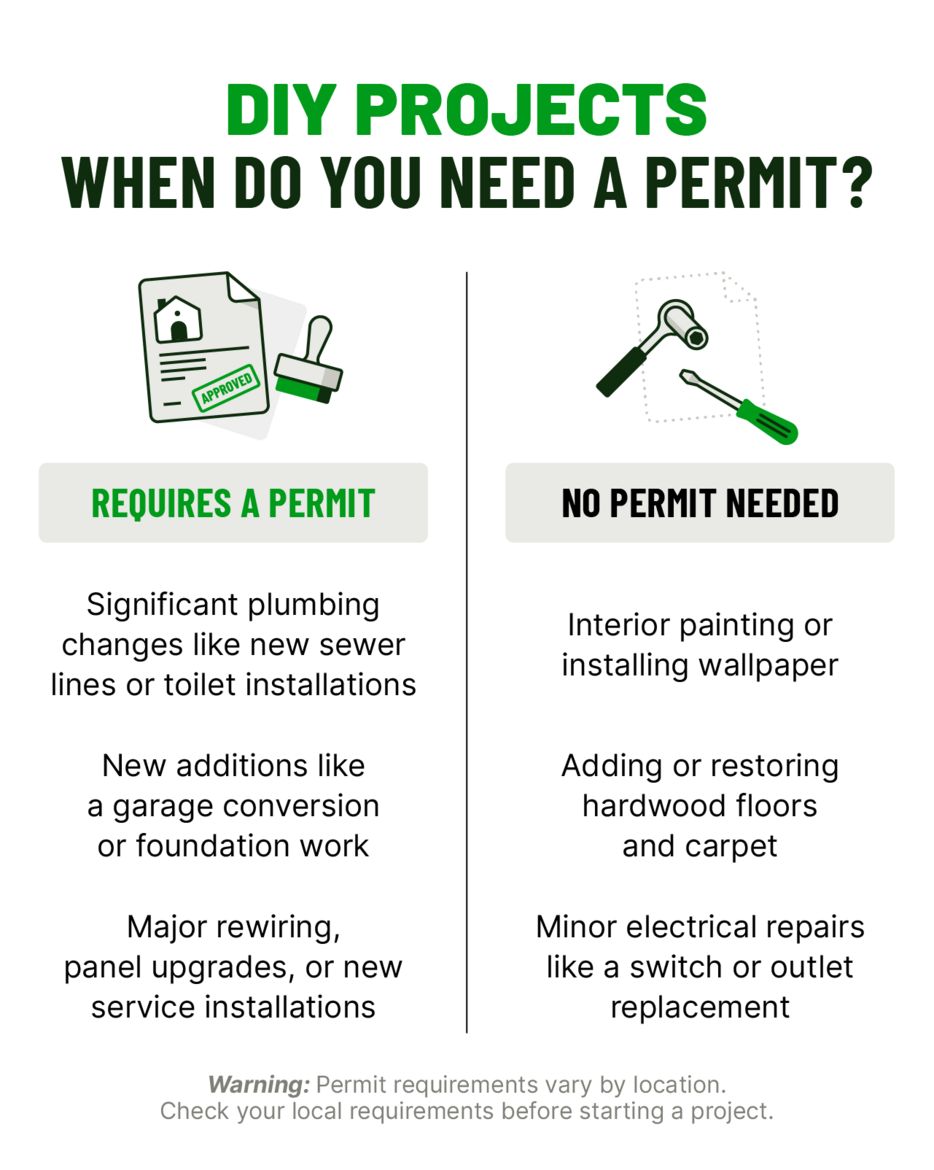
4. Ignoring permits and inspections

- Each city has its own rules about what requires a permit. Check with your local building department to confirm whether or not this applies to your specific DIY project.
- If you do need a permit, the first thing you can do is complete a permit application from your local building department.
- Filling out a permit typically involves fees. According to Bankrate, these permits can range from $50 to $2,000. Larger upgrades can cost more than smaller projects.
- Schedule any inspections that are required for your specific permit. These inspections can occur at various points in the project to ensure you comply with your local building codes.
- Once everything else is complete, you must wait to gain approval from your municipality. This timeline can vary depending on the project’s complexity and location.
- Apply for a permit as soon as possible. It’s important to start the process early (at least a few months before your project begins) and factor that time into your overall project plan.
5. Improvising with incorrect materials and tools
- Create a detailed project plan with information on the steps for each part of a project. This will likely take the most time, but it’s helpful to know what tools and materials you will need down the line.
- Make a list of all the tools and materials you need to complete the project on time, on budget, and safely and effectively.
- Take inventory of the tools you already own. Compare this to the list you created earlier and identify any gaps.
- Once you know what tools you need, consider if these are more specialized tools you’ll only use once or if they’re worth the long-term investment. See if family, friends, or your local home improvement stores would be willing to rent or loan their tools.
- Avoid choosing the cheapest option if it’s not the best choice for the job. While finding lower-cost tools or materials is budget-savvy, don’t let it consume your entire focus and compromise the safety or quality of your home.
6. Neglecting safety precautions
- Wear safety glasses when using power tools, cutting materials, or working with chemicals.
- Use tools according to the manufacturer’s instructions and inspect them for damage before or after use.
- If you’re working on an electrical system, make sure the power is turned off and use insulated tools.
- Inspect ladders beforehand, and maintain three points of contact while climbing to help ensure stability.
- Keep a fire extinguisher nearby and know how to use it, especially if there is an elevated risk of generating sparks or overloading circuits.
- Open windows or use fans for ventilation when working with paints, solvents, or power tools.
7. Not properly disposing of debris
- Research local regulations for waste disposal, including disposal sites for specific materials and any required permits.
- Simplify the disposal process by categorizing project debris into categories like standard waste, recyclable or reusable materials, donatable items, or hazardous waste.
- Handle hazardous materials like paint, chemicals, and electronics with care. Contact your local waste management for proper disposal methods.
- Consider hiring a junk removal service to handle debris removal efficiently and responsibly. Properly vet the company and ask for recipes to confirm that debris was taken to the proper channels for disposal.
8. Prioritizing design aesthetics over function
- Create a list of essential functions for the space before considering aesthetic elements. What do you need it to achieve beyond looking beautiful?
- Research materials, finishes, and layouts to help determine if they are both aesthetically appealing and realistic for your home or lifestyle.
- Experiments with different layouts to see which options work best. Don’t be afraid to experiment if it’s within scope!
- If applicable to your project, consider the importance of storage in your space. These solutions can enhance functionality and help reduce clutter.
- Focus on the details like proper lighting and comfortable seating. This can help drastically improve someone’s overall experience.
9. Underestimating how much of the renovation you can DIY
- Honestly evaluate your skills and experience level when it comes to the specifics of your project.
- Break down the project into smaller tasks. Identify which tasks you can confidently handle and which require specialized skills.
- Weigh the potential cost savings of DIY against the potential costs of mistakes or delays. Factor in the cost of renting tools or purchasing specialized materials.
- Consider your available time and the project timeline. If time is limited, hiring professionals might be more efficient.
- Some tasks, like electrical or plumbing work, require specific licenses and expertise. Prioritize safety by hiring professionals for these tasks.
- Be aware of local building codes and permits. Professionals can often navigate these complexities more efficiently.
- For tasks that significantly impact the project's outcome (e.g., foundation work, roofing), consider hiring professionals to ensure quality and longevity.

10. Setting an unrealistic timeline
- Divide the project into smaller, more manageable tasks for a clearer picture of the overall workload.
- Account for potential setbacks like material shortages, weather conditions, or tool malfunctions.
- Avoid overestimating your own productivity. Review your available time and working speed realistically.
- Consult with professionals or experienced DIYers for insights into project timelines.
- Try using calendars, project management apps, or spreadsheets to help visualize all the tasks in your timeline and track progress.
- Identify critical tasks (like gaining the right permits) and focus on completing those items first. This helps maintain project momentum.
- Build flexibility into your schedule and prepare for setbacks.
11. Hiring a professional without proper research
- Clearly outline the tasks you can take on and the tasks for a professional.
- Ask friends, family, or your larger community for referrals to trusted professionals.
- Verify that the contractors you’re considering have the necessary licenses and insurance to protect your interests.
- Request a portfolio documenting the professional’s previous projects. Check to see if this work aligns with your goals or desired style.
- Don’t be afraid to conduct informal interviews to determine their communication skills and professionalism.
- Ask for a detailed contract that outlines the project scope, timeline, payment terms, and any applicable warranties.
12. Working off the wrong measurements
- Don’t “eyeball it” when it comes to measurements. Use the correct tools like a tape measure, ruler, or laser distance meter.
- Measure twice, cut once. This is a common phrase among DIYers and helps ensure you’re careful now to avoid headaches down the road.
- Make sure you’re measuring on an even surface that’s clear of obstacles.
- If you can, lean on another person to review your work and help catch any errors you miss.
- Be patient and methodical when it comes to taking measurements. Rushing this phase can lead to mistakes.
- Be careful if you’re converting between different measurement systems. Double-check your calculations to help avoid mistakes.
13. Trying to tackle too many spaces at once
- Consider how each project would improve your quality of life or home quality. Prioritize the areas that require the most urgent home upgrades.
- Avoid biting off more than you can chew by setting achievable goals for each project.
- Divide larger projects into smaller, more manageable sub-projects, and only take on one area at a time without thoroughly considering the scope of work for each.
- Dedicate specific time blocks for each project to prevent feeling rushed or stressed.
- Organize materials for each space to avoid confusion and clutter.
- Avoid burnout by scheduling breaks between projects to rest and recharge.
Download our home renovation mistakes checklist


